Screen Space Lens Flare
A few years ago I wrote a blog post describing a screen space process for rendering lens flares. I had first read about this idea on Matt Pettineo’s blog (1), but the basic technique dates back to a GDC2003 presentation given by Masaki Kawase (2).
This post will be a more up-to-date and terse overview of the technique along with a couple of improvements to the compositing step. There is a sample implementation where you can refer to the final shader code.
Lens Flare
Lens flare is a photographic artefact caused by unintended reflections within the lens system (3). As with other photographic artefacts, it is desirable to emulate in games or CGI in order to create a ‘cinematic’ effect, enhancing realism by introducing the flaws found in real-world cameras. Along with other effects such as bloom, lens flares also increases perceived brightness, which is useful given the relatively low dynamic range of display devices.
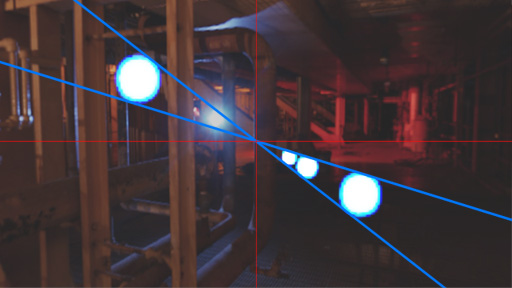
The ‘traditional’ approach to simulating lens flares is to draw sprites along a path from the light source through the image center, using some occlusion data at the light source to decide how bright the overall effect is. The downside of this technique is that it requires explicit placement of lens flares, as well as generating correct occlusion data to prevent the flare shining through foreground objects. If instead we use the rendered scene image to directly drive the lens flare effect, any bright area can cause a flare and occlusion is handled implicitly.
The screen space technique comprises the following 4 steps:
- Downsample the scene image.
- Generate lens flare features.
- Blur.
- Upsample/composite.
Downsample
This is very straightforward so I won’t describe it in detail. Very likely you’ll have already generated a downsampled version of the scene image as an input to other post processing effects (e.g. bloom) which can be reused. Choosing the downsampled size is a tradeoff: smaller render targets make the feature generation and blur steps cheaper, however you may need more blur to hide blocky artefacts if the resolution is too low. A nice middle ground might be to use a small Gaussian blur instead of a box filter during the downsampling.
Feature Generation
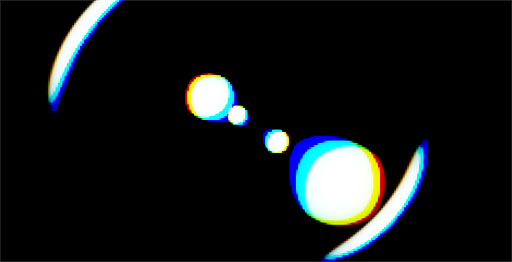
Here we read the downsampled scene image in order to generate lens the flare ‘features’. Bright areas in the source image should project to other parts of the image along a path through the image center. In a real flare, the shapes of the features are determined by a combination of the lens and aperture geometry. This is easier to emulate with a sprite-based lens flare, but for the screen space technique we are restricted to sampling the source image in novel ways.
Ghosts
‘Ghosts’ are repeating blobs which mirror bright spots in the source image. These can be generated by sampling along a vector which passes through the image center:
The number of samples and sample spacing can be exposed as external controls.
vec2 uv = vec2(1.0) - vUv; // flip the texture coordinates
vec3 ret = vec3(0.0);
vec2 ghostVec = (vec2(0.5) - uv) * uGhostSpacing;
for (int i = 0; i < uGhostCount; ++i)
{
	vec2 suv = fract(uv + ghostVec * vec2(i));
	float d = distance(suv, vec2(0.5));
	float weight = 1.0 - smoothstep(0.0, 0.75, d); // reduce contributions from samples at the screen edge
	vec3 s = SampleSceneColor(suv);
	s = ApplyThreshold(s, uGhostThreshold);
	ret += s * weight;
}
ApplyThreshold() is a function to isolate bright areas in the source image. A very simple implementation is as follows:
vec3 ApplyThreshold(in vec3 _rgb, in float _threshold)
{
	return max(_rgb - vec3(_threshold), vec3(0.0));
}
The samples are weighted to fade out ghosts for bright spots near the edge of the source image.
We can also modulate the color of the samples according to a texture gradient, sampled based on the distance to the image center (d in the code above). This can be applied globally or per-sample:

Halos
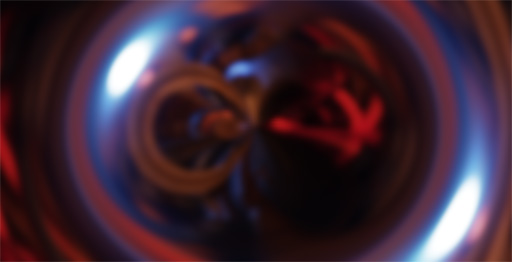
A different effect can be achieved by taking a vector to the center of the image (as for the ghost sampling) but fixing the vector length. In this case the source image is warped:
We can use this to produce a ‘halo’ feature, weighting the samples to restrict the effect to a ring:

By default the aspect ratio will match that of the scene image, however it is possible to correct for this in order to achieve a more (or less) circular halo:
vec2 haloVec = vec2(0.5) - _uv;
haloVec.x /= uAspectRatio;
haloVec = normalize(haloVec);
haloVec.x *= uAspectRatio;
vec2 wuv = (_uv - vec2(0.5, 0.0)) / vec2(uAspectRatio, 1.0) + vec2(0.5, 0.0);
float d = distance(wuv, vec2(0.5));
float haloWeight = Window_Cubic(d, uHaloRadius, uHaloThickness); // cubic window function
haloVec *= uHaloRadius;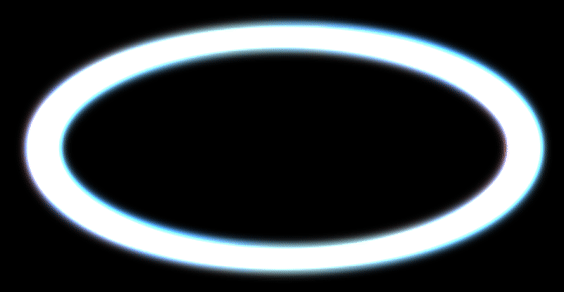
Chromatic Aberration
Chromatic aberration is another optical artefact, caused by varying indices of refraction for different wavelengths of light within the lens. We can emulate this by sampling red, green and blue channels at different offsets:
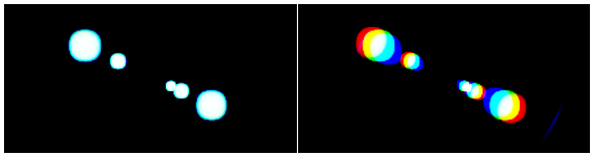
While this could be applied during the upsample/composite step, fewer texture fetches are incurred by doing it as part of the feature generation step (depending on the downsample size and number of features).
Blur
After feature generation, we’re left with something like this:
Aside from the blocky artefacts from the downsampling, there’s also the problem of the ghosts maintaining the shape of the source image. A liberal amount of blur addresses both issues:
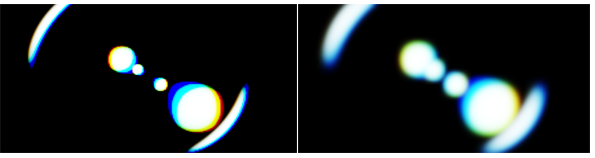
The sample uses a basic separable Gaussian blur, but there are numerous alternatives. Note that it is possible to trade blur quality for performance, depending on how the lens flare is applied to the final image (more subtle = less blur).
Upsample/Composite
At this point we could simply upsample the blurred features and additively blend them with the source image, however since this step is at full resolution we can take the opportunity to add some detail to the effect.
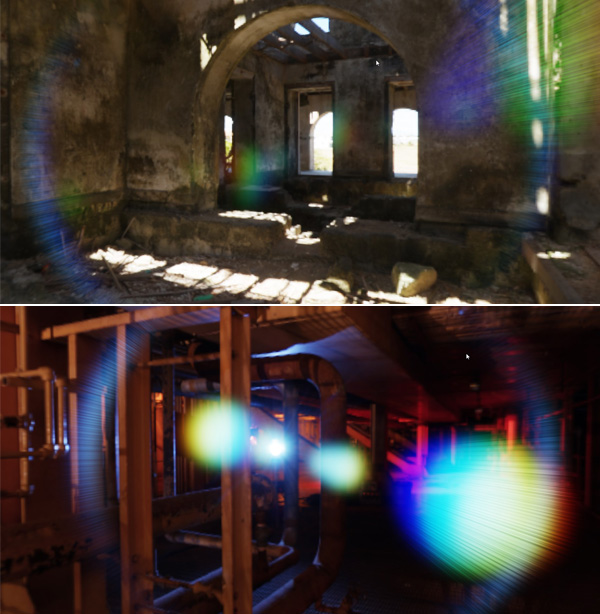
Lens Dirt
Used heavily in the Battlefield games, this is basically modulating the result by a static texture containing dust/scratches:

An improvement on the static mask would be to dynamically generate it, for example simulating rain drops or dust splashes on the camera lens.
Starburst
Another way to add detail is to generate a starburst emanating from the image center. This can be done cheaply using a small lookup texture with radial sampling:

Alone this doesn’t look very good, but by offsetting the texture coordinate as the camera rotates the effect shifts and phases in a plausible way:
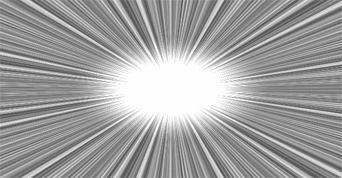
vec2 centerVec = vUv - vec2(0.5);
float d = length(centerVec);
float radial = acos(centerVec.x / d);
float mask =
	  texture(txStarburst, vec2(radial + uStarburstOffset * 1.0, 0.0)).r
	* texture(txStarburst, vec2(radial - uStarburstOffset * 0.5, 0.0)).r // rotate in the opposite direction at a different rate
	;
mask = saturate(mask + (1.0 - smoothstep(0.0, 0.3, d))); // fade the starburst towwards the center
uStarburstOffset should change continuously as the camera is rotating, e.g. by summing the components of the view vector.
Conclusion
While this isn’t a particularly sophisticated technique, it is very simple to implement and can produce nice results if applied very judiciously. Personally I’d avoid it and rely on bloom/glare to handle perceptual brightness, then perhaps use a sprite-based approach to add ‘hero’ lens flares (e.g. for the sun) - I’ll cover this in a future post.
References
- More Post-Processing Tricks: Lens Flare (Matt Pettineo)
- Frame Buffer Post Processing Effects in DOUBLE S.T.E.A.L (Masaki Kawase)
- Physically-Based Real-Time Lens Flare Rendering (Matthias Hullin, et al.)
The environment maps used in the screenshots are from the sIBL Archive.